Changing Android Spinner Text Size with Styles
The article Load Values into an Android Spinner showed how a Spinner is set up. It was stated in the article that the Spinner definition in the layout file does not define the View that the data being displayed uses. That is assigned when the Adapter that links the data to the Spinner is created. The previous article used the existing Android simple_spinner_item as the View for the data items. This has implications if the size of the Spinner text, or the color of the text needs to be changed. This tutorial covers changing the style of the text values in an Android Spinner.

(This Android Spinner styling tutorial assumes that Android Studio is installed, a basic App can be created and run, and the code in this article can be correctly copied into Android Studio. The example code can be changed to meet your own requirements. When entering code in Studio add import statements when prompted by pressing Alt-Enter.)
Create a New Studio Project
Create a new project in Android Studio, here called Spinner Style. An Empty Activity is used with other settings left at their default values. Follow the article Load Values into an Android Spinner to get a working Spinner running.
Why Using android:textSize on Spinner Does Not Work
The Properties list in Studio for the Spinner does not have a text size attribute (android:textSize), unlike, for example a TextView. This means trying to change the size of the text being displayed with android:textSize or android:textAppearance attributes on the Spinner definition is a no go.
Maybe a Custom Layout?
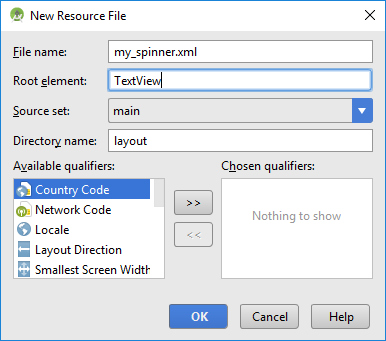
The solution to changing the Android Spinner text size is to pass in a custom layout. Instead of using an Android default layout like simple_spinner_item. Here a new Android layout XML file is created in the res/layout folder. Highlight the folder in the Project explorer and use the context menu (normally right-click) or the File menu and choose New, then Layout resource file. Call the file my_spinner.xml. Set the Root element to a TextView. Click OK.

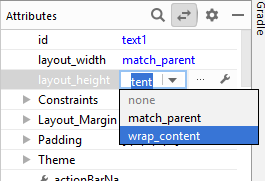
Set the id of the TextView in the new layout file to text1, and set a textSize of 24sp. The layout_width is match_parent and layout_height is wrap_content. Finally maxlines is set to 1.

The my_spinner.xml will be similar to this:
<?xml version="1.0" encoding="utf-8"?>
<TextView xmlns:android="http://schemas.android.com/apk/res/android"
    android:id="@+id/text1"
    android:layout_width="match_parent"
    android:layout_height="wrap_content"
    android:maxLines="1"
    android:textSize="24sp">

</TextView>
Pass the new layout to the ArrayAdapter creation (the id has to be text1 for the Adapter to use the View), replacing android.R.layout.simple_spinner_item with R.layout.my_spinner:
ArrayAdapter adapter = ArrayAdapter.createFromResource(
    this,
    R.array.context_names,
    R.layout.my_spinner);
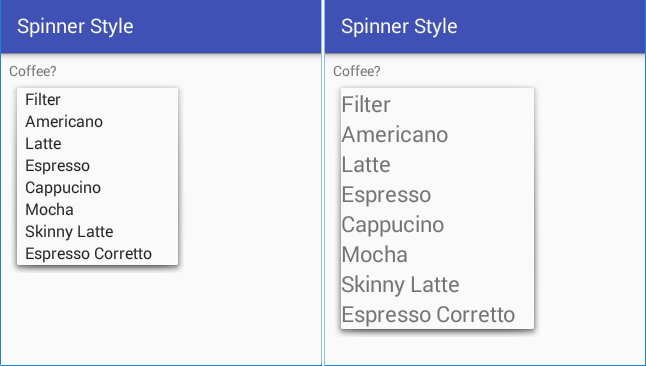
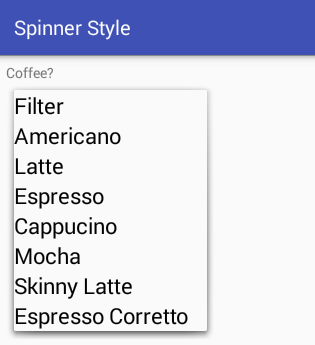
The text in the Spinner is now larger, but the default styling has been lost. This could be solved by assigning colors to the TextView, however, this would remove the Spinner styling from any theme that is being used on the device. Fortunately by using the Android feature that allows for the styling on Views to inherit from existing styles it is possible to get the Spinner back to the default theme but with the text size increase.
Extend the Default Theme
To achieve this create a new style XML file. Highlight the the res/values folder and use the context menu (normally right-click) or the File menu and choose New, then Values resource file, give it a name, here it is called my_styles.xml, the name is not important as long as a file of the same name does not exist. Click OK, other values remain as default (Source set is main, Directory name is values, no Chosen qualifiers).
In the new file a style element is defined. The name attribute given here is MySpinnerLook. This new style will inherit from an existing Android style. These can be viewed in Android's styles.xml file, not the project's styles.xml.
(The Android styles.xml can be viewed in the platforms/android-X/data/res/values folder, under the android-sdk folder. With X being the API level of the current Android platform. In the platform styles.xml is found the Widget.TextView.SpinnerItem style.)
The Widget.TextView.SpinnerItem style is assigned to the parent attribute of the new MySpinnerLook style (prefixed with @android:style/). The TextSize attribute is removed from the my_spinner.xml TextView layout file. It becomes an item (android:textSize) in the new style file. The my_styles.xml file will be similar to this:
<?xml version="1.0" encoding="utf-8"?>
<resources>
    <style name="MySpinnerLook"
        parent="@android:style/Widget.TextView.SpinnerItem">
        <item name="android:textSize">24sp</item>
    </style>
</resources>
With the my_spinner.xml file no longer having the TextSize attribute the link to the new style file is with a style attribute pointing to MySpinnerLook. The my_spinner.xml will now be similar to this:
<?xml version="1.0" encoding="utf-8"?>
<TextView xmlns:android="http://schemas.android.com/apk/res/android"
    android:id="@+id/text1"
    android:layout_width="match_parent"
    android:layout_height="wrap_content"
    android:maxLines="1"
    style="@style/MySpinnerLook">

</TextView>
The text is now bigger and with the correct font color. The new my_styles.xml file can be used to customise the Spinner text as required.

The Spinner styling source code is available in styling_spinner.zip or from the Android Example Projects page.
Summary
In summary to change the text size (or other style attributes) for a Spinner either:
- Create a custom TextView layout.
- Change the text size with the android:textSize attribute.
- Change the text color with android:textColor.
Or:
- Create a custom style.
- Use @android:style/Widget.TextView.SpinnerItem as the parent style.
- Change the text size with the android:textSize attribute.
See Also
- See the other Android Studio example projects to learn Android app programming.
Archive Comments
Adil on March 28, 2012 at 12:20 pm said: Thanks for this. Went through loads of tutorials and this was the only one that made sense!
Pawan on May 6, 2013 at 12:54 pm said: Very nice tutorial.
Author:Daniel S. Fowler Published: Updated:


