Load Values into an Android Spinner
This Android Spinner example takes a look at loading string items into the Spinner. The demo code provided is an Android Studio Spinner example project. The Spinner View is useful when you want the user to pick an item from a predetermined list, but do not want to take up a lot of screen space (such as using several radio buttons). Programmers moving to Android from other environments will notice a difference in terminology. The Android Spinner behaves in a similar fashion to what some may call a drop down list. A Spinner on other platforms is closer to the Android Pickers, which are often seen when setting dates and times on an Android device.

(This Android loading Spinner tutorial assumes that Android Studio is installed, a basic App can be created and run, and the code in this article can be correctly copied into Android Studio. The example code can be changed to meet your own requirements. When entering code in Studio add import statements when prompted by pressing Alt-Enter.)

The Android UI Pattern
Programmers coding with the Android SDK soon come across a familiar pattern when designing the user interface. There are the Views that make up the screens (managed by Activites). There is data that needs to be displayed in those Views. Finally there is the code that links the Views to the data. For some Views and types of data the code that links them together is provided by an Adapter. In this example the data is an array of strings, the View is the Spinner, and an ArrayAdapter is the link between the two.
Create a New Studio Project
Create a new project in Android Studio, here called Spinner Demo. An Empty Activity is used with other settings left at their default values.
Add the Data
The array of strings is defined in a values file in the res/values folder. Use the Project explorer to open the file strings.xml. Enter the values for the Spinner into a string array. Here a list of types of coffee is going to be used. Here is an example strings.xml with a string array called coffeeType:
<resources>
    <string name="app_name">Spinner Demo</string>
    <string-array name="coffeeType">
        <item>Filter</item>
        <item>Americano</item>
        <item>Latte</item>
        <item>Espresso</item>
        <item>Cappucino</item>
        <item>Mocha</item>
        <item>Skinny Latte</item>
        <item>Espresso Corretto</item>
    </string-array>
    <string name="coffeePrompt">Choose Coffee</string>
</resources>
Add the Spinner
The Spinner is added to the activity_main.xml layout file (in the res/layout folder). Open the layout file and delete the default Hello World! TextView. From the Palette drag and drop and Spinner onto the layout. Update: You won't find the Spinner in some versions of Studio's Palette, use the Text tab to switch to XML mode, copy and paste the <Spinner.../> code below. Set Spinner id to chooseCoffee (if dropping onto a ConstraintLayout), also set the required constraints layout_width and layout_height to wrap_content. The activity_main.xml file will be similar to this:
<?xml version="1.0" encoding="utf-8"?>
<android.support.constraint.ConstraintLayout xmlns:android="http://schemas.android.com/apk/res/android"
    xmlns:app="http://schemas.android.com/apk/res-auto"
    xmlns:tools="http://schemas.android.com/tools"
    android:layout_width="match_parent"
    android:layout_height="match_parent"
    tools:context=".MainActivity">

    <Spinner
        android:id="@+id/chooseCoffee"
        android:layout_width="wrap_content"
        android:layout_height="wrap_content"
        android:layout_marginLeft="8dp"
        android:layout_marginTop="8dp"
        android:prompt="@string/coffeePrompt"
        android:spinnerMode="dialog"
        app:layout_constraintLeft_toLeftOf="parent"
        app:layout_constraintTop_toTopOf="parent" />
</android.support.constraint.ConstraintLayout>
Add the Code to Load the Spinner
The Spinner added to the layout file is the basic framework, a layout will also be required to hold the data values in the collapsed and expanded state. Fortunately, for simple uses, Android includes default layouts. To connect the array to the Spinner an ArrayAdapter is created. The ArrayAdapter class has a static method that can take existing suitable resources and use them to create an ArrayAdapter instance. The method createFromResource() takes the current Context, the resource id of the string array, and the resource id of a layout. That layout will be used to display the selected array item when the Spinner is collapased (by default this layout is repeated to show the list of items in the expanded state). A layout for the data item has not been defined, instead an Android default simple_spinner_item layout is used. Here is the code for the MainActivity Java class:
package com.example.spinnerdemo;

import android.support.v7.app.AppCompatActivity;
import android.os.Bundle;
import android.widget.ArrayAdapter;
import android.widget.Spinner;

public class MainActivity extends AppCompatActivity {

    @Override
    protected void onCreate(Bundle savedInstanceState) {
        super.onCreate(savedInstanceState);
        setContentView(R.layout.activity_main);
        //an adapter is linked to array and a layout
        ArrayAdapter adapter = ArrayAdapter.createFromResource(
                this,
                R.array.coffeeType,
                android.R.layout.simple_spinner_item);
        //link the adapter to the spinner
        Spinner coffeeChoice = (Spinner) findViewById(R.id.chooseCoffee);
        coffeeChoice.setAdapter(adapter);
    }
}
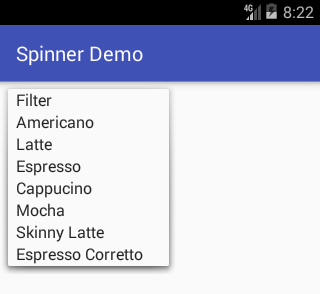
Run the project to see the Spinner in action.

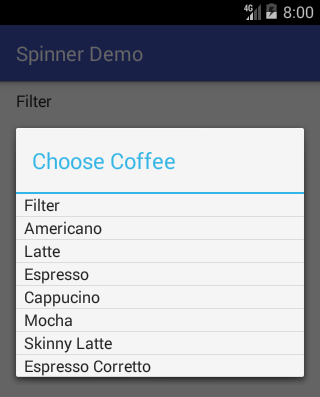
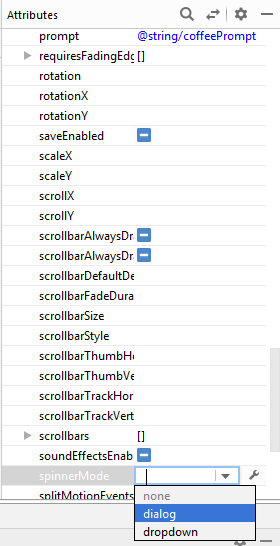
The Spinner supports a dialog style (see the first graphic at the top of the tutorial). To see it first set the Spinner prompt property to the Choose Coffee string (@string/coffeePrompt, see strings.xml above). Then change the spinnerMode property to dialog.

The loading Spinner source code is available in loading_spinner.zip or from the Android Example Projects page.
See Also
- See the other Android Studio example projects to learn Android app programming.
Archived Comments
Isuru on March 8, 2013 at 5:38 am said: Thanks loads. It helps alot.
Pawan on May 6, 2013 at 12:56 pm said: Very Nice tutorial.
Author:Daniel S. Fowler Published: Updated:


