Android Launcher Icons Using Inkscape
Every good Android Application (App) deserves a custom launcher icon. If you don't want to use an existing image then a graphics program is used to design the launcher icon, and other graphical resources. Inkscape is a free multi-platform and feature rich graphics program. It can be used to generate vector graphic images to a high standard and supports exporting to a bitmap file to any required resolution. This is ideal for generating the different size launcher icons (and other graphical resources) needed for an App. Inkscape can be used to adjust the images obtained from the Open Clip Art Library before generating resources.
Android Icon Sizes
When a project is created in Android Studio default icons are generated in the res/mipmap folders. Android icons are small square Portable Network Graphics (PNG) files. The default icon size is 48 by 48 pixels. Android supports different screen densities, measured in Dots Per Inch (dpi), which is the same as Pixels Per Inch (PPI) for device displays. The 48×48 pixel icon is suitable for medium density screens, for all other densities the 48×48 pixel icon is scaled up or down as required. Ideally for sharp images with no pixelation a project will include an icon for all the possible screen densities that an App will encounter. There is a lot of variation in Android device screen size and resolution therefore screen densities are grouped into ranges:
- 36×36 pixel icon in the res/mipmap-ldpi folder (optional) for low density displays (approx. 120 dpi)
- 48×48 pixel icon in the res/mipmap-mdpi folder for medium density displays (approx. 160 dpi)
- 72×72 pixel icon in the res/mipmap-hdpi folder for high density displays (approx. 240 dpi)
- 96×96 pixel icon in the res/mipmap-xhdpi folder for extra high density displays (approx. 320 dpi)
- 144×144 pixel icon in the res/mipmap-xxhdpi folder for extra extra high density displays (approx. 480 dpi)
- 192×192 pixel icon in the res/mipmap-xxxhdpi folder for extra extra extra high density displays (approx. 640 dpi)
Each icon must include a spacing border around the central image, used for on screen spacing and minor image protrusions (such as the bag handle and drop shadow in this example where the border has been indicated in red):
![]()
The recommended border is one twelfth of the icon size. This means that the space the actual icon image occupies is smaller than the icon pixel size:
- For a 36×36 icon the usable image space is 30×30 pixels.
- For a 48×48 icon the usable image space is 40×40 pixels.
- For a 72×72 icon the usable image space is 60×60 pixels.
- For a 96×96 icon the usable image space is 80×80 pixels.
- For a 144x144 icon the usable image space is 120x120 pixels.
- For a 192x192 icon the usable image space is 160x160 pixels.
Android Icon Design
When designing an icon it is better to work with images that are larger than the required size. A larger image is easier to work with in a graphics package and easily scaled down when completed. An image that is 576×576 pixels is divisible equally by all the icon sizes and is a reasonable size in which to design. For a vector based graphics package, such as Inkscape, the image size is irrelevant; it can be scaled up and down without losing quality. Inkscape uses the open Scalable Vector Graphics (SVG) format. Image detail is only lost when the final bitmap images are produced from the vector image.
Another reason to design the icon at a much larger size is to allow the production of the High Resolution Application Icon that is required when publishing an App on Google Play. The Google Graphic Assets for Apps web page (summarised here) states that the required High Resolution Application Icon needs to be 512×512 in size (the image can be smaller to allow for padding or drop shadows, for example 464×464 on the 512×512 canvas giving 48 pixels for padding and drop shadows).
Those wanting to learn to design images in Inkscape can use the many tutorials available. Inkscape has a few built in tutorials (via the Help menu) and there are many online, the website https://inkscapetutorials.org/ is a good tutorial reference.
Once an image has been designed in Inkscape it can be exported to a PNG file for use as an App icon. In the following example the image that is to be converted to icons was generate from the tutorial at http://design.tutsplus.com/tutorials/creating-a-coffee-cup-with-inkscape--vector-30. If the tutorial is followed this cup of coffee image is produced ready for converting into an icon:

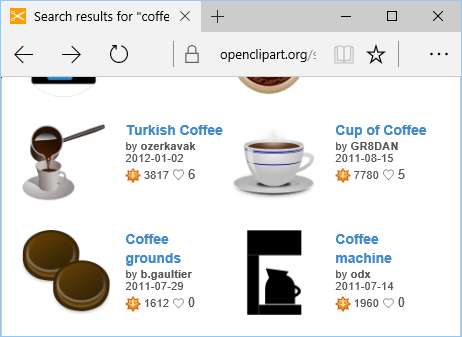
For those who do not want to follow the tutorial the image can be obtained from http://openclipart.org, a great source of free SVG clip art images. Search for coffee and you will see various coffee related images including the cup of coffee. Click on the image and use the Download button to get the SVG file for loading into Inkscape.
Android Icon Files Generation
The required icon sizes are generated from the image using the Inkscape Export Bitmap option. The image is opened and then correctly proportioned for the export. This can be done for any image designed or opened in Inkscape. Remember that images for icons should not be overly detailed or have too many colors (detail is reduced during resizing), and try to fill a square area. It is worth reading the Android guide lines on design at https://developer.android.com/design/index.html and icons at https://developer.android.com/guide/practices/ui_guidelines/icon_design_launcher.html.
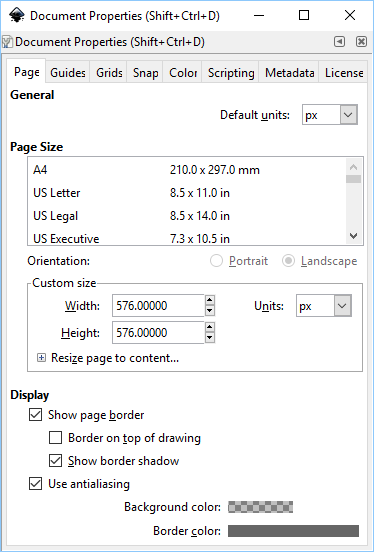
With the image open resize the document to 576×576 pixels. To do this use the Document Properties option under the File menu. On the Page tab in Custom size set Width and Height to 576 and confirm Units are set to px (for pixels). Ensure that the Show page border check box is ticked.
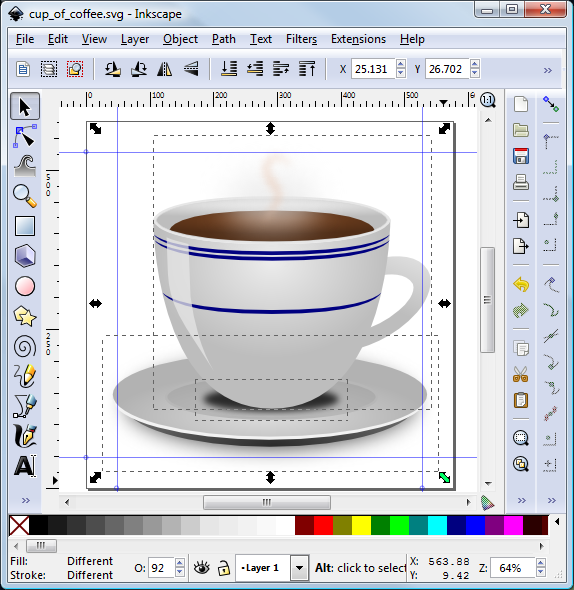
Drag two vertical and two horizontal guides from the corresponding rulers (click and drag from any part of the page ruler). If the rulers are not visible use Ctrl-R to show them or the View then Show/Hide menu and select Rulers. Drag them inside each page border approximately 1/12 of the width and height of the visible page border. The accurate position of the guides will be set using the guide properties. Double click each guide and set the following positions accurately:
| Guide | x | y |
|---|---|---|
| Top Horizontal | 0 | 528 |
| Bottom Horizontal | 0 | 48 |
| Left Vertical | 48 | 0 |
| Right Vertical | 528 | 0 |
With the guides in place the image can be easily adjusted to fit within them. Minor protruding into the border area is allowable if required for image balance. Use the menu Edit then Select All or press Ctrl-A to select all the image, drag the image into position and resize as appropriate with the black arrow resize handles to fit within the box outlined by the guides.
The correctly proportioned image is now used for the icon bitmaps for an Android Studio project. Deselect the image in Inkscape (click outside the image). Use the File then Export PNG Image menu option to open the export options. Select Page, then under Image size set the icon Width and Height. See the Android Icon Sizes section above. The dpi setting does not need to be changed (it will change as Width and Height are changed). Under Filename browse to the App's project directory and locate the res/mipmap folders. Select the folder for the icon, the default file name is ic_launcher.png.
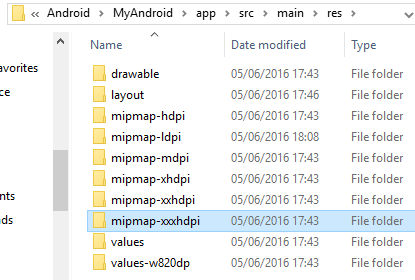
E.g. For the xxxhdpi icon set height and width to 192 and select the res/mipmap-xxxhdpi directory with ic_launcher.png for the file name. Press the Export button to generate the icon.
![]()
For the other required icons Width and Height appropriately (36, 48, 72, 96, 144) browse to the correct mipmap folder to export each size of icon. This process will have generated the different size icons required to support different device screens.

The App can be tested on physical and virtual devices to ensure the icons appear as expected.
![]()
The icon files do not need to be called ic_launcher.png, see the tutorial [Free Android Icons Using OpenClipArt.org and Paint.NET]("Icons Using OpenClipArt.org and Paint.NET") for information on changing the launcher icon file name. The coffee cup icons can be grabbed from coffecupicon.zip, also accessible from an Android Resources page.
High Resolution Launcher Icon Publishing Image
Inkscape is suitable for designing all the graphics required when publishing an App (see Graphic Assets for Apps. To generate the High Resolution Launcher Icon for publishing use the same method as generating the small icons. For the export set the Width and Height values to 512, then export to a file for later use when the completed App is being published.
Archived Comments
Sebastian Tibichi on August 13, 2012 at 3:21 pm said - Nice to see somebody doing something like this in Inkscape.
Thanks for sharing.
Cheers!
donfede on October 20, 2012 at 4:17 pm said - Thanks for the straigt forward tutorial. As a gimp veteran (and inkscape n00b) I was able to quickly create improved icons for my android app.
best,
donfede
ken on December 8, 2012 at 3:39 am said - I created an extension for inkscape to export the 4 sizes directly to the right place in the res folder of your project. Check it out.
https://github.com/kengoodridge/android4inkscape
Mike Evans on April 21, 2014 at 8:33 am said - Don’t forget thay Inkscape can be used from the command line. Once I’ve created the svn I use a script to generate the drawables:
~!/bin/sh
INFILE=$1
# Assume squares only for now.
SIZE=$2
if [ “$INFILE” = “” ];then
echo -e “\nNo input file specified\n\n”
exit
fi
OUTFILE=$(echo $INFILE | awk -F. ‘{print $1″.png”}’)
echo $OUTFILE
#exit
# Assuming were in a gti repo get the top level.
GIT_TOP=$(git rev-parse –show-toplevel)
# Now find the target directory.
TDIR=$(find $GIT_TOP -type d -name res | grep -v bin)
inkscape -z -f $INFILE -e $TDIR/drawable-xhdpi/$OUTFILE -h 96 -w 96
inkscape -z -f $INFILE -e $TDIR/drawable-hdpi/$OUTFILE -h 72 -w 72
inkscape -z -f $INFILE -e $TDIR/drawable-mdpi/$OUTFILE -h 48 -w 48
inkscape -z -f $INFILE -e $TDIR/drawable-ldpi/$OUTFILE -h 36 -w 36Author:Daniel S. Fowler Published: Updated:


