Virtual CentOS on Windows Using VirtualBox
This article is an introduction to installing a CentOS virtual machine on Windows. This allows a CentOS Linux server to run on top of Windows, inside the virtual machine (VM). CentOS will boot within a window on the Windows desktop. The free VirtualBox application is used to manage the VM.

What is CentOS?
The Community Enterprise Operating System (CentOS) is a free Linux operating system based upon Red Hat Enterprise Linux (RHEL). Security updates are provided for 10 years from a version release which makes it a good operating system (OS) choice for companies and users who want to invest in systems over a long time period. RHEL is provided via a subscription so that RHEL users get automatic support. CentOS support is provided by the community via forums, question and answer boards and other Internet based sources. CentOS can be used as a server OS and a desktop OS. As a server OS it can be used for cloud computing, web servers and on a virtual private server (VPS).
Why Run CentOS on Windows?
There are several reasons for running CentOS on a Windows machine. Here is a list of some of those reasons:
- Learning about and practicing on using Linux and the GNU tools.
- Setting up a Linux test environment.
- Replicating cloud or Internet based environments locally as a back up or for testing.
- Replicating an Internet located Virtual Private Server (VPS) locally to test configuration and software deployment changes before live deployment.
- Compiling a software release for testing on CentOS.
- Preparing to migrate from Windows to CentOS.
- CentOS training for Windows users.
- Evaluating RHEL over a period longer than 30-days (RHEL trial version is limited to 30 days but CentOS is compatible with RHEL).
Is VirtualBox Installed?
To run a virtual CentOS server on Windows a VM is needed. Here the VM is provided by the free VirtualBox software maintained by Oracle. VirtualBox needs to be installed on the Windows machine. Follow this download link and install VirtualBox. For more information on installing VirtualBox on Windows see our article Virtualization Software for Windows, Run Another OS for Free.
Download the CentOS Disc Image
The latest releases for CentOS are listed on the Download CentOS Linux ISO images web page. The current version of CentOS only supports 64-bit machines. Use the x86_64 link for a list of mirror sites that host the CentOS images. (For 32-bit CentOS 6 images click the i386 link.) Select a mirror location to view the various ISOs available. For this article the minimal CentOS-7-x86_64-Minimal.iso image is used, for a base CentOS install. This is suitable for running a CentOS web server, VPS or similar server role. Once CentOS setup is complete other software applications and programs can be added or removed from it at any time. (Note: The image file names may include a version number, e.g. CentOS-7-x86_64-Minimal-1503-01.iso.)
Create a New VM in VirtualBox
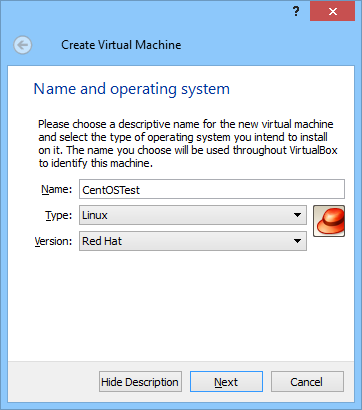
Start VirtualBox and select New (using the tool bar icon or Machine menu). This starts the Create Virtual Machine wizard. Give the new VM a name, e.g. CentOSTest, the Type and Version should be set to Linux and Red Hat. Click the Next button.
The memory size options are then shown. The default of 768MB is adequate for most uses. Increase the amount if needed (e.g. for heavy database use). Alternatively set it to match the memory of a production machine if configuring the VM for test purposes. The more memory allocated to the VM the less memory is available to Windows. Allocating above 1GB is likely to cause problems for 32-bit Windows host machines. Click the Next button to confirm the allocated memory.
On the Hard disk screen the selected Create a virtual hard drive now option will be used for a new virtual disk. Click the Create button. On the Hard disk file type screen click Next to accept the default VDI (VirtualBox Disk Image) format. The Storage on physical hard disk should be set to dynamically allocated to save on disk space. Click Next and adjust the size of the hard disk to create, the default of 8GB is suitable for a basic server. Then click Create to confirm the location of the disk file and the VM will be created.
Set the CentOS Install ISO
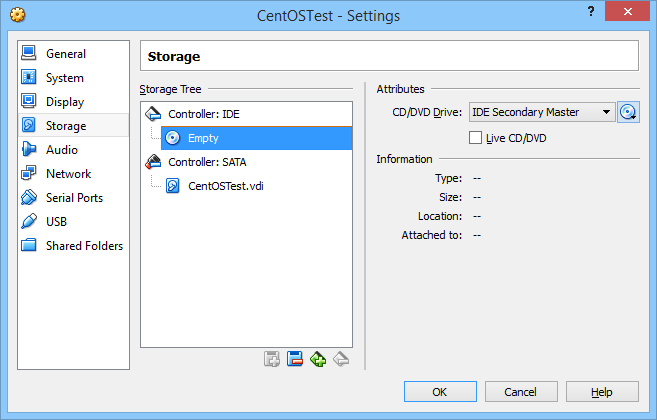
With the new CentOS VM highlighted in VirtualBox select Settings (from the tool bar icon or Machine menu). In the Settings screen select Storage from the left hand list. Click on the CD icon in the Storage Tree. Click the CD icon in Attributes to browse to the CentOS ISO download image. Select the ISO file and click OK.
Boot the CentOS VM
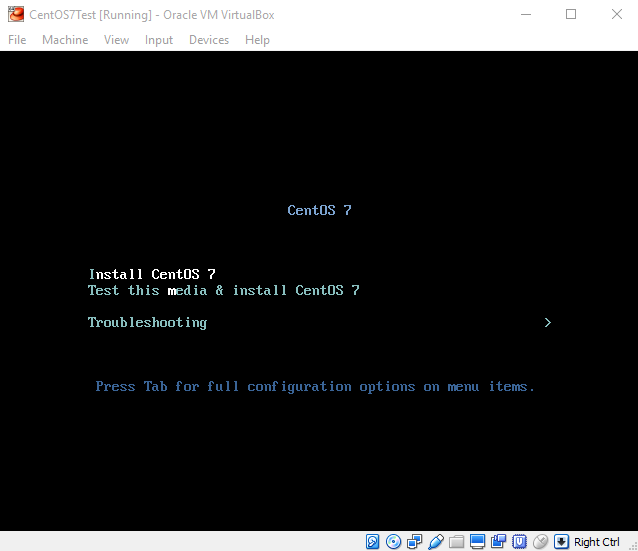
With the CentOS VM highlighted in VirtualBox select Start (from the tool bar or Machine menu). The VM will start and the CentOS boot loader will run from the ISO image file. Select the install option using the arrow keys and hit enter to begin the CentOS installation. Follow the on screen instructions.
Using the Windows Mouse In the VirtualBox Virtual Machine
The keyboard can be used to move around the install screens, using the tab and cursor (arrow) keys. Use the space bar or enter key to select options. Clicking in the VM window may capture the Windows mouse pointer. To get the mouse pointer released press the right-hand control key (this is the default key to release the capture).
On some Windows systems with more than one monitor (dual monitor or above) the mouse may not function correctly. Usually if the VM window is not on the primary screen. The workaround is to release the capture (right control key) and drag the VM window on to the primary screen. The mouse can then be used in the VM.
Complete the CentOS Installation Steps
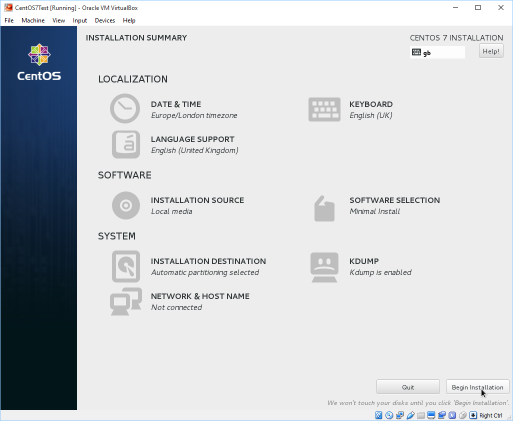
If asked to test the installation media select Skip. Select the required language and keyboard. On the Installation Summary" the defaults are set. If required set the appropriate timezone. Enter the Installation Destination" option to confirm the VirtualBox hard disk is the selected drive for automatic partioning by pressing Done. The Network & Host Name option can be selected to enable the network card (set to ON) and optionally set a hostname.
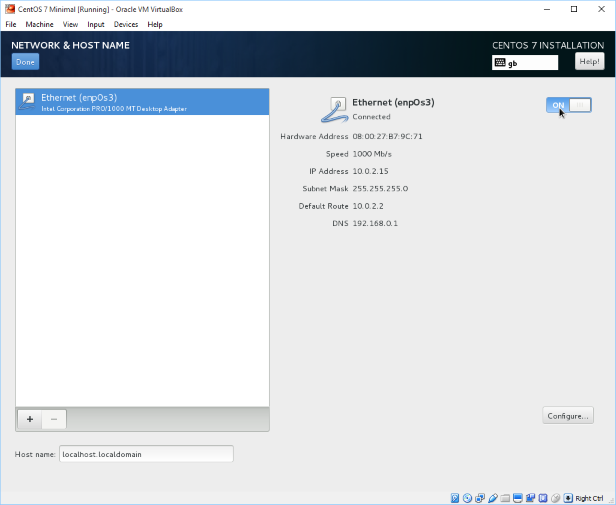
Note: For a minimal installation ISO the Software Selection option is irrelevant, though available, as the ISO does not contain the optional packages to install. (Selecting additional packages will have no affect, see the Known Issues section in the CentOS release notes). Additional software can be installed using the yum command from the shell when the VM is running.
Select Begin Installation. (A warning message maybe displayed beginning Error processing drive. Since this is a new installation of CentOS simply select Re-initialize). A progress bar will be shown during the Package Installation.
Next the important password for root (administrator) access to the CentOS VM is entered (twice), using the Root Password option on the Configuration screen.
The Importance of Passwords
Selecting a good password is always important as it is usually the first line of defence against cyber attacks. Whilst a long random password is best it can be difficult to remember. The alternative is to think of a combination of words or a phrase that means something to you so it is easier to remember. This makes it easy to visualise the password and not have to write it down. For example if your favourite number is 7 and you own a goldfish, then imagine a goldfish swimming in 7s, and use it as a prompt for a password, 7My7Pet7Goldfish7. This is a diffcult password for someone to guess, but easy to remember because it relates to you.
For a test VM a secure password may not be required, but it is good to develop a security habit. Even test systems can be a back door to other systems. There are websites that can generate difficult passwords. For example the Random Password Generator. Only keep written copies of such passwords in securely hidden locations (not in plain view on your desk).
Finish Installation
After selecting Finish Installation CentOS will be installed onto the VM hard disk and a Reboot option is shown.
Virtual CentOS on Windows is Ready to Use
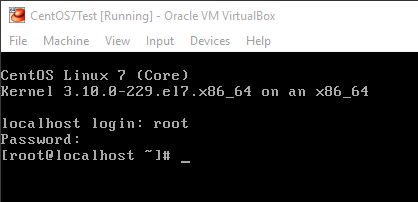
Select Reboot and the CentOS VM reboots ready for use. However, depending upon the final use further configuration changes may be required (network, firewall, other settings and installation of additional packages). Login is via the command prompt, initially with the root user configured during install. It is suggested that additional users are created so the root login is only used when required.
Further Information
There is a lot of information available to help with running a Linux systems. Though it can sometimes be difficult finding easy step-by-step guides for specific tasks. Here are some useful starting points:
- CentOS Documentation Page
- Linux Tutorials at Penguin Tutor
- The Linode Guides & Tutorials is a good source for server topics
- Introduction to Linux online book
Questions with answers (and to ask your own questions as a last resort.
- Centos forum
- Unix and Linux on StackExchange
- Server Fault for system administrators
See Also
- For a full list of the articles on Tek Eye see the full site Index
Author:Daniel S. Fowler Published: Updated:


